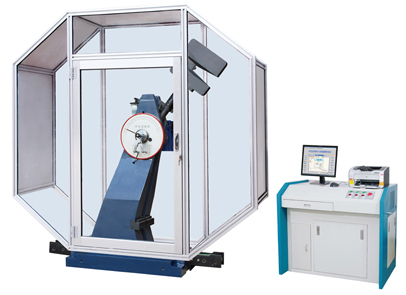
JBW-HC Instrumented metal pendulum impact testing machine

Product name:JBW-HC Instrumented metal pendulum impact testing machine
Product Description
JBW-HC Instrumented metal pendulum impact testing machine is the instrument to test the metal materials under dynamic load impact resistance, using fully automated control, through the software realizes takes place, the whole process of impact test, can continuously do metal impact test is metal material manufacturer, necessary for quality inspection departments detection equipment, and scientific research units for new materials indispensable for the research of the testing instrument.
JBW-HC Instrumented metal pendulum impact testing machine is the instrument to test the metal materials under dynamic load impact resistance, using fully automated control, through the software realizes takes place, the whole process of impact test, can continuously do metal impact test is metal material manufacturer, necessary for quality inspection departments detection equipment, and scientific research units for new materials indispensable for the research of the testing instrument.
Product details

Product advantage
JBW-HC instrument (more precisely should be digital) metal pendulum impact testing machine, so that the impact of the test in two aspects have a significant change.
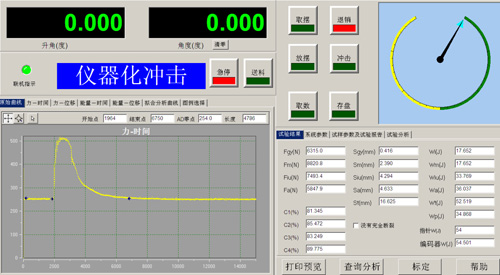
The instrument metal pendulum hammer impact testing machine and ordinary testing machine main different point is instrumented (digital): the control, shows the energy and impact curve acquisition and processing are to achieve digital. Impact test results using a graphical display so that the image of, impact force - time impact force - displacement curve

The second is "the standardization of instrumented impact test method", it makes the impact test the change. This change reflected in the following aspects:
1. impact work is defined according to the definition of physical work: work = force X displacement to define the area under the impact force displacement curve;
2. Impact curve defined 13 reflect the impact property of material parameters and ordinary method of impact test for given only one impact energy parameters compared to 13:1, can not say that is a qualitative change.
3. 13 individual parameters, four force, displacement, four energy parameters. They are expressed materials under impact load, the elastic, plastic and fracture process performance index. This is mark of qualitative change of impact test;
4. image of the impact test. It can also be like a tensile test, such as the impact force displacement curve, we can see the image of the impact of the image to see the process of deformation and fracture;
5. increases the impact parameters of the material's toughness and brittleness: the crack shape, the crack growth work and the ductile fracture rate.
Functional characteristics
1. can be directly displayed force - time, force - displacement, energy - time, energy - displacement, force - time - energy, force - displacement - energy and other 6 kinds of curves.

2. according to the pendulum angle to calculate the impact power.
3. according to the force sensor to measure the value to calculate yield force, the maximum stress and unstable crack extension force onset and unstable crack expansion terminating force four force; yield displacement, maximum force displacement and unstable crack extension of initial displacement and unstable crack extension termination displacement, displacement of the five displacement; maximum force energy and unstable crack extended initial energy and unstable crack expansion of the termination of the energy, total energy, energy, C1, C2, C3, C4 four fracture toughness ratio of 19 results.
4. the machine equipped with full closed door cover, effectively prevent fracture specimen splash, also can prevent the testing personnel on the test into the testing machine internal. For the safe operation of the user to provide the conditions. Metal materials manufacturer, quality inspection departments necessary testing instruments, as well as scientific research institutions, new materials research indispensable testing equipment.
5. the integration of the main frame and the pedestal casting processing, high stability, good rigidity, no assembly error. Upright front back symmetry, pendulum with simply supported beam is supported, is simple and reliable in structure, high machining accuracy, small energy loss, a pendulum to swing without fibrillation, more suitable for high-energy impact.
6. hanging off the swing device with a buffer design, to avoid the hanging pendulum impact and it may cause damage, effectively reduce the hanging and swinging the noise, prolongs the service life of the equipment and improve the safety and keep swing hammer pre yang angle accurately.
7. angle acquisition using high-precision optical encoder, the angle resolution of up to 0.045 degrees, to ensure the accuracy of the impact energy of the equipment.
8. the energy display device has a display of three kinds of energy, dials show that second, encoder, through sensor force measuring, computer software to calculate the display. This machine is shown. The results can compared with each other, can completely eliminate possible problems.
9. the customer can be configured according to the test requirements of different force sensor impact blade, such as to meet the ISO, GB standard R2 blade, to meet the R8 standard ASTM blade.
satisfying criteria
GB/T19748-2005《Steel Charpy V - notch pendulum impact test method test instrument》
GB/T19748-2005《Steel Charpy V - notch pendulum impact test method test instrument》
GB/T 3808-2002 《Inspection of pendulum impact testing machine》
GB/T 229-2007 《Metallic materials Charpy pendulum impact test method》
JJG 145-2007 《Charpy impact testing machine 》
ISO 14556-2000 《Steel - Charpy V-notch pendulum impact test-Instrumented test method》
ISO 148.1-2009《Metallic materials — Charpy pendulum impact test —Part 1:Test method》
ISO 148.2-2008《Metallic materials — Charpy pendulum impact test —Part 2:Verification of testing machines》
ISO 148.3-2008《Metallic materials — Charpy pendulum impact test —Part 3:Preparation and characterization of Charpy V-notch test pieces for indirect verification of pendulum impact machines
ASTM E23
Main technical parameters
| type | JBW-300HC | JBW-500HC | JBW-750HC |
| impact energy | 300J | 500J | 750J |
| Scale range and index value | 0-300J Per small scale value 2J | 0-500J Per small scale value 3J |
0-750J Per small scale value
|
| The pendulum shaft axis to blow the distance from the center | 800mm | 800mm | 800mm |
| Maximum impact speed | 5.4m/s | 5.4m/s | 5.4m/s |
| The sample bearing span | 40 | ||
|
End arc radius of specimen bearing
|
R1-1.5mm | ||
|
Impact cutting edge radius
|
R2-2.5mm | ||
|
Dynamic force sensor
|
40kN | ||
|
Impact angle
|
30° | ||
|
Thickness of impact knife
|
16 mm | ||
|
Sample size
|
10×10×55 mm | ||
|
Force sensor accuracy
|
Static linear error:FS1%(10%-50%);2%(50%-100%) dynamic error :﹤2%; |
||
|
Angular displacement sensor resolution
|
0.045° | ||
|
Maximum sampling frequency
|
20MHz | ||
|
Measurement system frequency response
|
500kHZ | ||
|
Testing machine dimensions
(including fully enclosed shield)
|
2090*590*2110mm | ||
上一篇:没有了
下一篇:没有了
